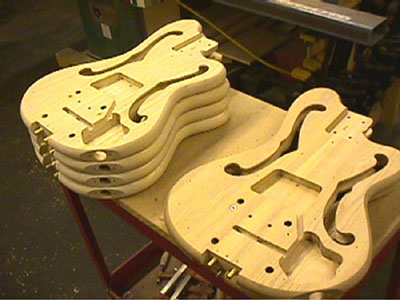
Here is a stack of bodies, complete and ready for paint. The long brass bars that connect the
tailpiece to the bridge can be seen sticking out of the tailpiece pocket. The four round holes
are vents for the acoustic chambers surrounding the bridge area.
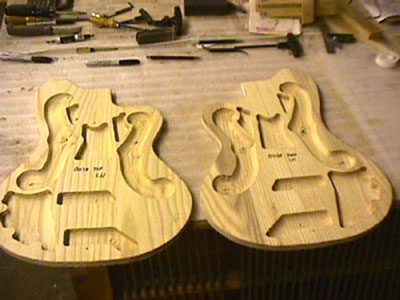
Here are the front and back of a body with all of the internal routing completed. You can see the
undercut areas of the F-holes and the acoustic chambers.
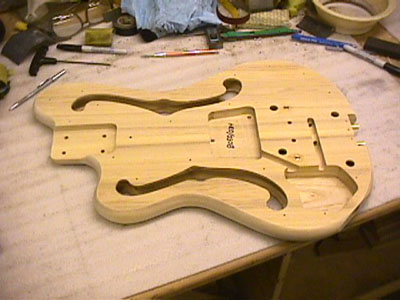
A completed body for a left hand instrument, the third I've built so far.

The pickguard is fitted to the body and trimmed around the edges of the F-holes, the neck pocket,
and the tailpiece pocket.
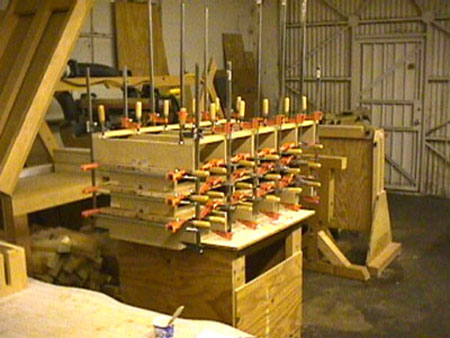
Here's my clamping rig for edge gluing the ash boards for the body. Each of the three boards
being glued here will be cut in half and become the top and back for one body.
|
|
The body of the AEB-2/AUB-2 is made in four pieces; two halves of the top and two halves
of the back. The pieces aren't "bookmatched", but they are all cut from the same board,
so they are consistent in weight and appearance. All of the glue joints are done with
Smith's Tropical Hardwood Epoxy, which is a special blend that's designed for hardwoods.
First, a long narrow board is crosscut in two, and the two parts are jointed and edge glued
together. This board is then crosscut in two again, and the two parts become the top and
back of one body. The acoustic chambers and the undercut areas around the inside of the
F-holes are routed into the top & back before they are glued together. Then, a series of
routing operations cut the control cavities, F-holes, etc. Even with all the fixtures that
I've built, it takes me about 5 hours to make each body, not including the paint.
I've been experimenting with different woods for the body, and I've settled on western
white ash (not "swamp" ash) as the best for this instrument. It has the characteristics
that I need to create the tone that I want, and it's consistent and readily available.
It also has a very dramatic grain that looks great with the sunburst finish. During the
development, I've built and tested bodies made of maple, koa, Honduras mahogany, and
Philippine mahogany. It turns out the center area of the body between the neck pocket and
the bridge plays an important part in shaping the tone of the instrument. The stiffness
and damping properties of the wood in that area make a big difference.
I've found that the ash bodies give the instrument a strong, punchy mid range, and a lot
of clarity at the bottom end. Ash just has a clear, reverberant ring to it when you knock on
it. In comparison, instruments with mahogany bodies lose some of the low-mid range clarity
and volume, but have a "sweeter" or warmer high end. That's because the mahogany body is
weaker and more flexible than the ash body, so it's flexing more each time the string
oscillates, particularly at lower frequencies. On an oscilloscope, the weaker body drains
energy out of the strings, making the frequency spikes lower in amplitude, but wider at the
bottom.
My goal was to combine the best of both of these tonal characteristics, so I took the
approach of starting with an ash body, and then gradually weakening it structurally in
the center area to bring out the sweeter high end. I did this by routing pockets into the
inside of the top and back before gluing them together, leaving a group of hollow chambers
seperated by thin walls of solid wood.
It's a little misleading to call these hollow areas "acoustic chambers", because they work
in a different way than the chambers in an acoustic instrument. Their purpose isn't to
generate audible tone by moving air; it's to change the way the body flexes. A better term
might be "weakening holes", but "acoustic chambers" is probably less confusing. They do
change the tone of the instrument, but in a roundabout way by altering the frequency
profile of the vibrating string. This, in turn, can be heard and felt when the instrument
is played unplugged, and of course it's detected by the pickup system and sent to the amp.
The important point is that the acoustic chambers, as used here, do not make the AEB-2/AUB-2
loud enough to be played unplugged as an acoustic instrument. This is still an electric bass that
requires an amplifier! However, it is very resonant compared to most basses, and you can really
feel it vibrating against you.
Anyway, I experimented with different sizes and shapes of the acoustic chambers on six of
the prototypes before I settled on the configuration that seems to work best. It sweetens
the high end almost as much as mahogany bodies, but without losing the clarity
and punch of the solid ash body. The chambers also added some more sustain and "bloom" to
the tone, which is the opposite of what I would expect. They also cut almost a pound off
the overall weight, which never hurts! So, this design body is now on all instruments from
#022 on, and many of the earlier prototypes have been retrofitted.
In early '97, I built three prototypes with maple bodies, as was used on the original
Ampegs. They turned out to be overkill on the AEB-2/AUB-2. These instruments had tremendous
clarity and sustain, but they were too cold and synthetic sounding. They also weighed more
than 11 pounds! I sold one of them, AEB-2 #004, and its owner loves it for studio work, where
he uses lots of effects. The other two, AUB-2 #003 and AUB-2 #005, have since been refitted with
chambered ash bodies.
More Images Of Bodies Under Construction...
|
|